If you love crispy snacks, you're in for a treat! Welcome to the world of loaded potato skins, where each bite is a fun explosion of flavor. In this guide, I'll show you how to make crispy restaurant-style loaded potato skins that are perfect for any occasion. Get ready to impress your family and friends with this easy recipe. Let’s dive into the tasty journey of creating your very own delicious potato skins!
Why I Love This Recipe
- Irresistible Crunch: The crispy texture of the potato skins adds a delightful contrast to the creamy toppings, making every bite a satisfying experience.
- Customizable Toppings: These loaded potato skins can be tailored to fit any taste. Add jalapeños for heat, or swap the cheddar for your favorite cheese!
- Perfect for Sharing: These delicious snacks are great for parties or game days, allowing everyone to dig in and enjoy together.
- Easy Preparation: With simple ingredients and straightforward steps, you can whip up a batch of these potato skins with minimal effort.
Ingredients
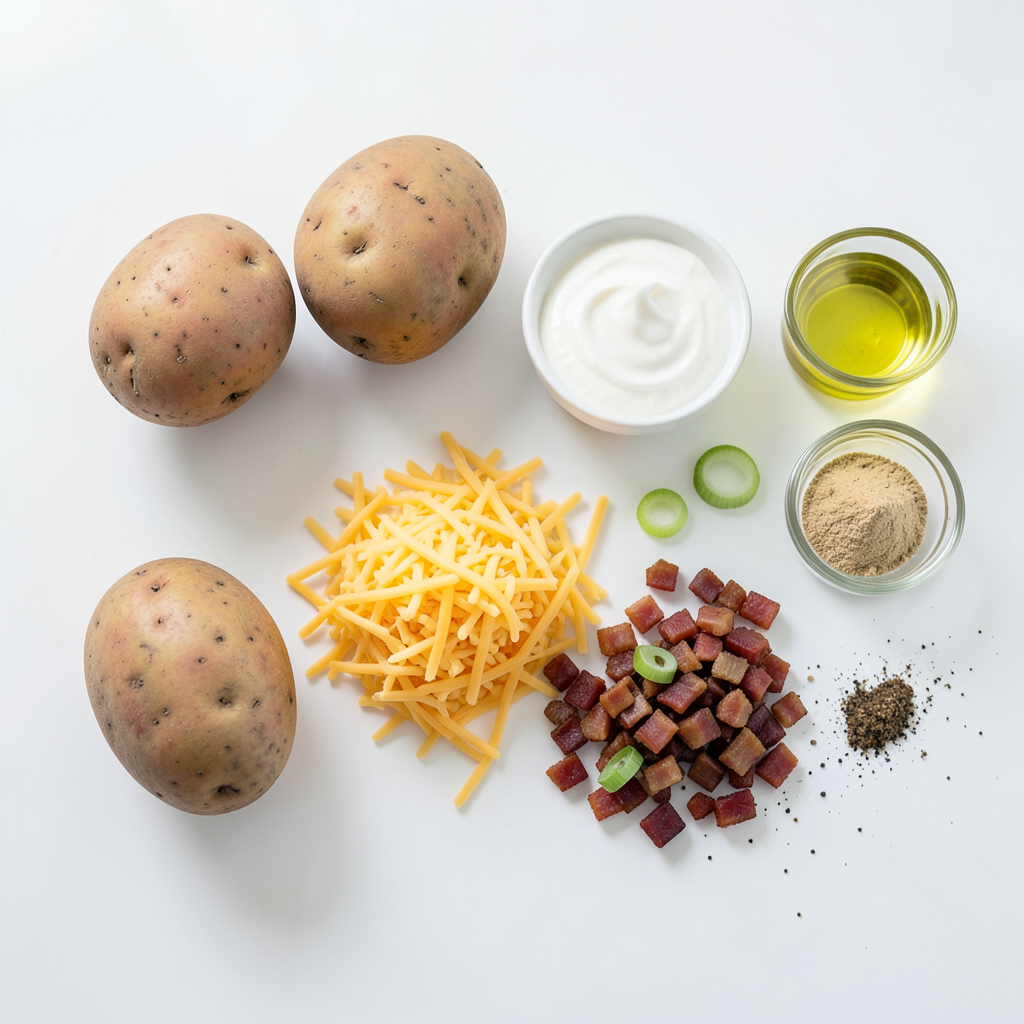
List of main ingredients
To make crispy loaded potato skins, gather these main items:
- 4 medium russet potatoes
- 1 cup shredded cheddar cheese
- 1/2 cup sour cream
- 1 tablespoon olive oil
- 1 teaspoon garlic powder
- Salt and pepper to taste
Optional ingredients for customization
You can add fun toppings to make your potato skins unique:
- 1/2 cup cooked bacon bits
- 1/4 cup green onions, sliced
- Fresh parsley for garnish
Cooking essentials
You will need a few tools for this recipe:
- Baking sheet
- Fork
- Knife
- Mixing bowl
- Spoon for scooping
These ingredients and tools will help you create a tasty snack. Get ready to enjoy your loaded potato skins!
Step-by-Step Instructions
Preparation of the potatoes
First, you need to scrub the potatoes. Use cold water to clean them well. Pat them dry with a towel. Next, prick each potato with a fork a few times. This helps steam escape while baking. Rub olive oil all over the potatoes. Sprinkle salt and pepper on them for flavor.
Baking and cooling process
Now, it's time to bake. Preheat your oven to 400°F (200°C). Place the potatoes directly on the oven rack. Bake for 45 to 60 minutes. You can check if they are soft by inserting a fork. Once done, take them out and let them cool for about 10 minutes. This cooling time helps you handle them safely.
How to assemble and bake potato skins
Reduce your oven temperature to 375°F (190°C). Cut each potato in half lengthwise. Carefully scoop out some of the flesh, but leave about 1/4 inch for the shell. Place the potato skins cut side up on a baking sheet. Brush the insides with olive oil. Sprinkle garlic powder, salt, and pepper on them.
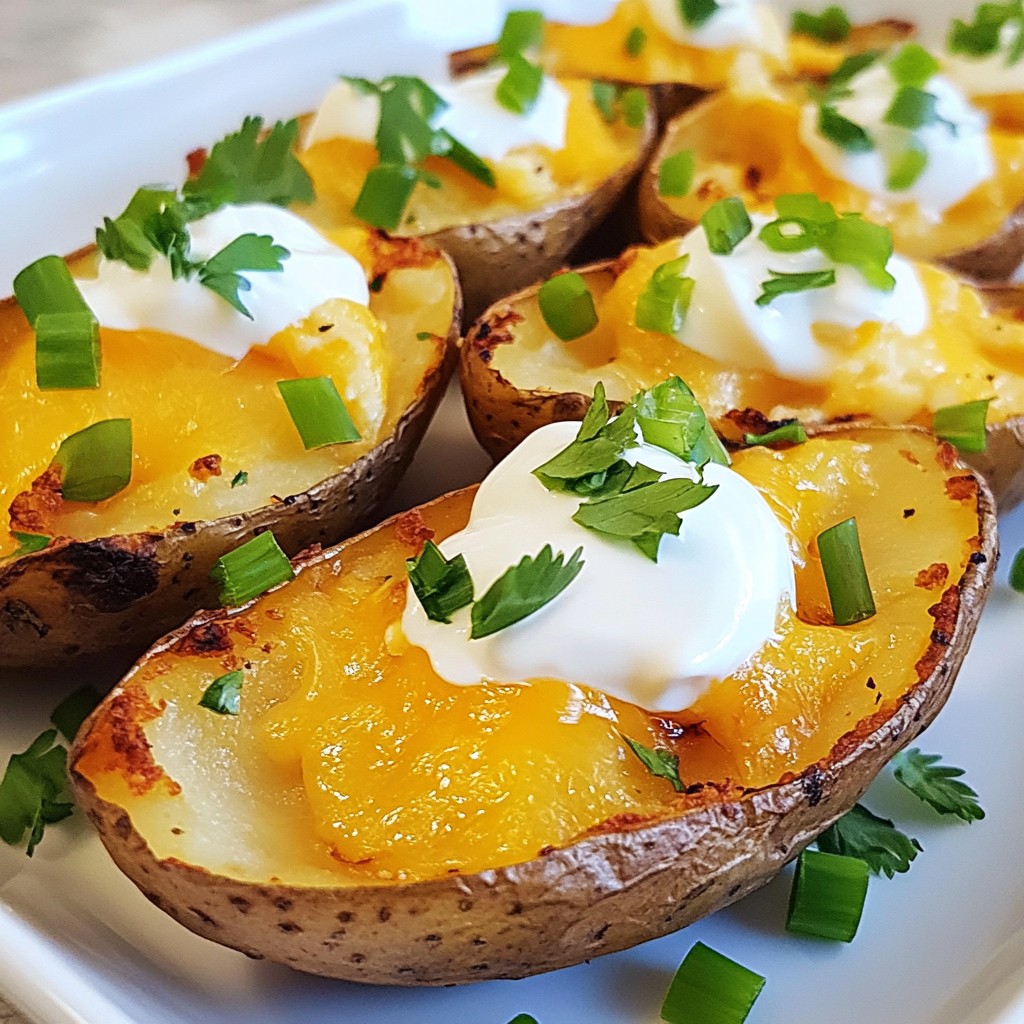
Bake the potato skins for 10 to 15 minutes. You want them crispy and golden brown. After that, add shredded cheddar cheese inside each skin. If you like, sprinkle bacon bits on top. Return them to the oven for 5 minutes until the cheese melts. Finally, top with sour cream and green onions. Your crispy loaded potato skins are ready to serve!
Tips & Tricks
Achieving the perfect crispy texture
To get crispy potato skins, start with good russet potatoes. Their thicker skin works best. Bake them until soft, then scoop out some flesh. This helps the skins crisp up. Brush the insides with olive oil. Add garlic powder, salt, and pepper for flavor. Bake them cut side up and keep an eye on them. You want a nice golden color.
Alternative methods for cooking (air fryer, etc.)
If you want to use an air fryer, it works great! Preheat it to 375°F (190°C). After scooping out the flesh, brush the skins with oil as before. Place them in the air fryer basket. Cook for about 8-10 minutes. Check halfway to flip them for even crispiness. The air fryer gives a nice crunch without heating the whole oven.
Recommended toppings and serving suggestions
Toppings make your loaded potato skins shine! The classic choice is shredded cheddar cheese. Once melted, add cooked bacon bits if you like meat. Green onions add a fresh bite. For a creamy finish, add a dollop of sour cream. You can also sprinkle fresh parsley for color. Serve these hot for the best taste!
Pro Tips
- Choose the Right Potatoes: For the best texture, use medium-sized russet potatoes. They have a high starch content, making them fluffy on the inside and crispy on the outside.
- Don’t Skip the Fork Pricking: Pricking the potatoes allows steam to escape while baking. This prevents them from bursting in the oven.
- Extra Crispy Skins: For even crispier skins, brush the insides with a little melted butter in addition to olive oil before baking.
- Customize Your Toppings: Feel free to experiment with toppings! Try adding jalapeños, diced tomatoes, or different types of cheese for a unique twist.
Variations
Vegetarian loaded potato skins
You can make tasty vegetarian loaded potato skins by skipping the bacon. Use black beans or chickpeas instead for protein. Add diced tomatoes, corn, and avocado for more color and flavor. Top with cheese and sour cream for a creamy finish. You can also add your favorite spices, like cumin or chili powder, to enhance the taste. These will still be crispy and satisfying.
Spicy loaded potato skins
If you like heat, try spicy loaded potato skins. Mix diced jalapeños or serrano peppers into your toppings. Use pepper jack cheese for a kick. You can also drizzle hot sauce on top before serving. This adds a nice layer of flavor and spice. Serve with a cooling dip, like ranch, to balance the heat.
International twists on the recipe
Get creative with global flavors for your loaded potato skins. For a Mexican twist, top with guacamole and salsa. For an Italian version, use marinara sauce and mozzarella cheese. You could even make a Greek version with feta cheese, olives, and tzatziki sauce. Each twist brings a new taste and keeps things fun.
Storage Info
How to store leftovers
To keep your loaded potato skins fresh, store them in an airtight container. Make sure they cool down first. Place a layer of paper towel in the container. This helps absorb moisture. Keep them in the fridge for up to three days.
Reheating instructions
Reheat your potato skins in the oven for best results. Preheat your oven to 350°F (175°C). Place the skins on a baking sheet. Heat for about 10-15 minutes or until they are warm and crispy. You can also use a microwave, but it may make them a bit soft.
Freezing options and tips
You can freeze loaded potato skins for later use. First, let them cool completely. Wrap each skin in plastic wrap, then place them in a freezer bag. They can stay in the freezer for up to three months. To cook, thaw in the fridge overnight. Then, follow the reheating instructions above for a tasty treat.
FAQs
How do I make sure my potato skins are crispy?
To get crispy potato skins, start by baking the whole potatoes well. After baking, let them cool a bit. Then, scoop out the flesh but leave some inside. Brush the skins with olive oil. This step adds flavor and helps crisp them up. Bake them again until they are golden and crunchy.
Can I use different types of cheese?
Yes, you can use many types of cheese. Cheddar is classic, but feel free to mix it up. Gouda, Monterey Jack, or pepper jack add unique flavors. Try a blend for extra taste. Just remember to shred the cheese for easy melting on your skins.
What are some good dipping sauces for loaded potato skins?
Sour cream is a must-have. It pairs well with the cheese and bacon. You can also try ranch dressing for a creamy touch. For something spicy, add hot sauce or sriracha. Barbecue sauce works too, giving a sweet and smoky flavor.
How can I meal prep loaded potato skins?
Meal prepping is simple. Bake the potatoes ahead of time and store them in the fridge. When ready to serve, scoop the flesh and add toppings. You can even freeze the filled skins. Just bake them from frozen, adding a few extra minutes to the cook time.
In this post, we covered the key elements of making loaded potato skins. We explored ingredients, including optional ones for your unique twist. You learned step-by-step how to prepare, bake, and assemble them. Tips for texture and serving suggestions were also shared, plus variations to suit different tastes. Finally, we discussed storage and reheating methods to keep leftovers fresh.
Enjoy experimenting with this recipe! Discovering new flavors will lead to tasty results.